
How I take Notes: Putting Theory into Practice
A Practical Guide on How to Take Notes. In This Second Part, We Will Explore how I Practically Take Notes.

In the first part of the "How I Take Notes" series, we covered some basic theory and principles of note-taking. The goal wasn't to be comprehensive, but rather to introduce you to concepts that will help you understand the practical part I'll be sharing with you today.
However, note-taking is a vast and constantly evolving field, with various methodologies. But remember, there's no right or wrong way to take notes. The most important thing is to find a system that works best for you, based on your personal needs, style, and habits.
In this issue, I'll be sharing my own approach to note-taking, with the hope that it will provide you with some inspiration to enhance your own process. While my approach may not be the perfect fit for you, I believe that it's always useful to learn from others and discover new techniques that can improve our productivity and creativity.
So, without further ado, let's dive right in!
🔄 Note-taking Workflows
We already talked about the importance of processing notes and how PARA and Zettelkasten methods can help with that. But what exactly is a note-taking workflow?
A note-taking workflow is a structured process for capturing, organizing, processing, and reviewing information using a note-taking system. It involves multiple stages, such as:
🎣 Capturing notes. This initial step involves using a specific tool like a notebook or a digital note-taking app to capture notes.
🗂️ Organizing notes. In this step, notes are organized by topic, category, or other criteria, making them easy to find and retrieve later.
⚙️ Processing notes. This step entails reviewing and analyzing the notes, extracting key information, and transforming them into a more permanent form, such as literature notes and evergreen/permanent notes.
👀 Reviewing notes. This step involves regularly reviewing notes to reinforce learning and identify new connections and insights.
🧹 Clean notes. This last step is crucial to be sure that you keep your system clean and efficient.
A good note-taking workflow should be flexible, efficient, and effective, enabling the user to capture and retain important information, retrieve it easily, and use it to achieve their goals.
🗄️ Building a Note-taking System
Good note-taking methodologies and efficient workflows are the most important parts of what is called a note-taking system. But there’s one last bit missing.
While we've discussed effective methodologies and workflows for note-taking, selecting the right tools is equally important and part of the note-taking system itself. In theory, you can use pen and paper to implement what we've seen so far, but we are in 2023, and we of course want to take digital notes.
Several apps are available for note-taking, and while all of them are potentially suitable for handling complex processes, some make life more manageable.
Apple Notes, MS OneNote, Simple Notes, and others are all suitable for basic note-taking, but they don't offer tools to process, link, and review notes.
Here's a list of tools that are much more suitable for our purpose:
All of these tools have their unique features, but I recommend Obsidian for its simplicity, active community, and wide range of plugins that extend its functionality. It's an excellent tool that can help you capture and organize information in a way that is both useful and accessible.
So if you haven't already, please download Obsidian and start exploring it.
🚶♂️First Steps with Obsidian
At first, Obsidian might seem daunting due to its extensive range of options and functionalities. However, as you familiarize yourself with the app, you'll grow to appreciate its powerful capabilities.
Obsidian is a Markdown editor that enables you to perform basic tasks such as:
📝 Creating documents in markdown format
📄 Utilizing templates to generate documents
👀 Previewing formatted documents
🗄️ Organizing documents within folders
🔗 Linking documents to one another
#️⃣ Tagging documents
📅 Creating daily notes
These features alone provide a solid foundation for implementing an effective note-taking system and applying the methodologies we've discussed earlier. However, Obsidian also offers additional functionalities that elevate note-taking to new heights:
🔙 Backlinks, which show you where notes are connected
📊 Graph view, providing a comprehensive, bird's-eye view of all your notes
🔁 Sync (paid), allowing you to back up your notes in the cloud
🎨 Themes, offering customization for the appearance of your interface
🧩 Plugins (core and community), which expand existing functionalities
Numerous tutorials, videos, and communities are dedicated to Obsidian, and while this article isn't intended as an Obsidian tutorial, I highly recommend exploring the app on your own.
Although this workflow can potentially work with any note-taking app, from this point on, all examples presented will refer specifically to Obsidian.
🚀 My Note-taking System
While I love the note-taking methodologies I've described (PARA, Zettelkasten), taking them literally wouldn't be entirely compatible with my needs. For example, PARA is based on the actionability of notes and folder structure, while Zettelkasten counts on links, and ideally, folders shouldn't be used.
That's why I use an hybrid approach, taking the best parts of different methods:
PARA to manage actionable things and generic knowledge about my interests
Zettelkasten for complex and conceptual notes
Additional folders for journaling, personal stuff, people, and system things
Johnny Decimal system to glue everything together (more on that later)
So let's dive into my notes organization.
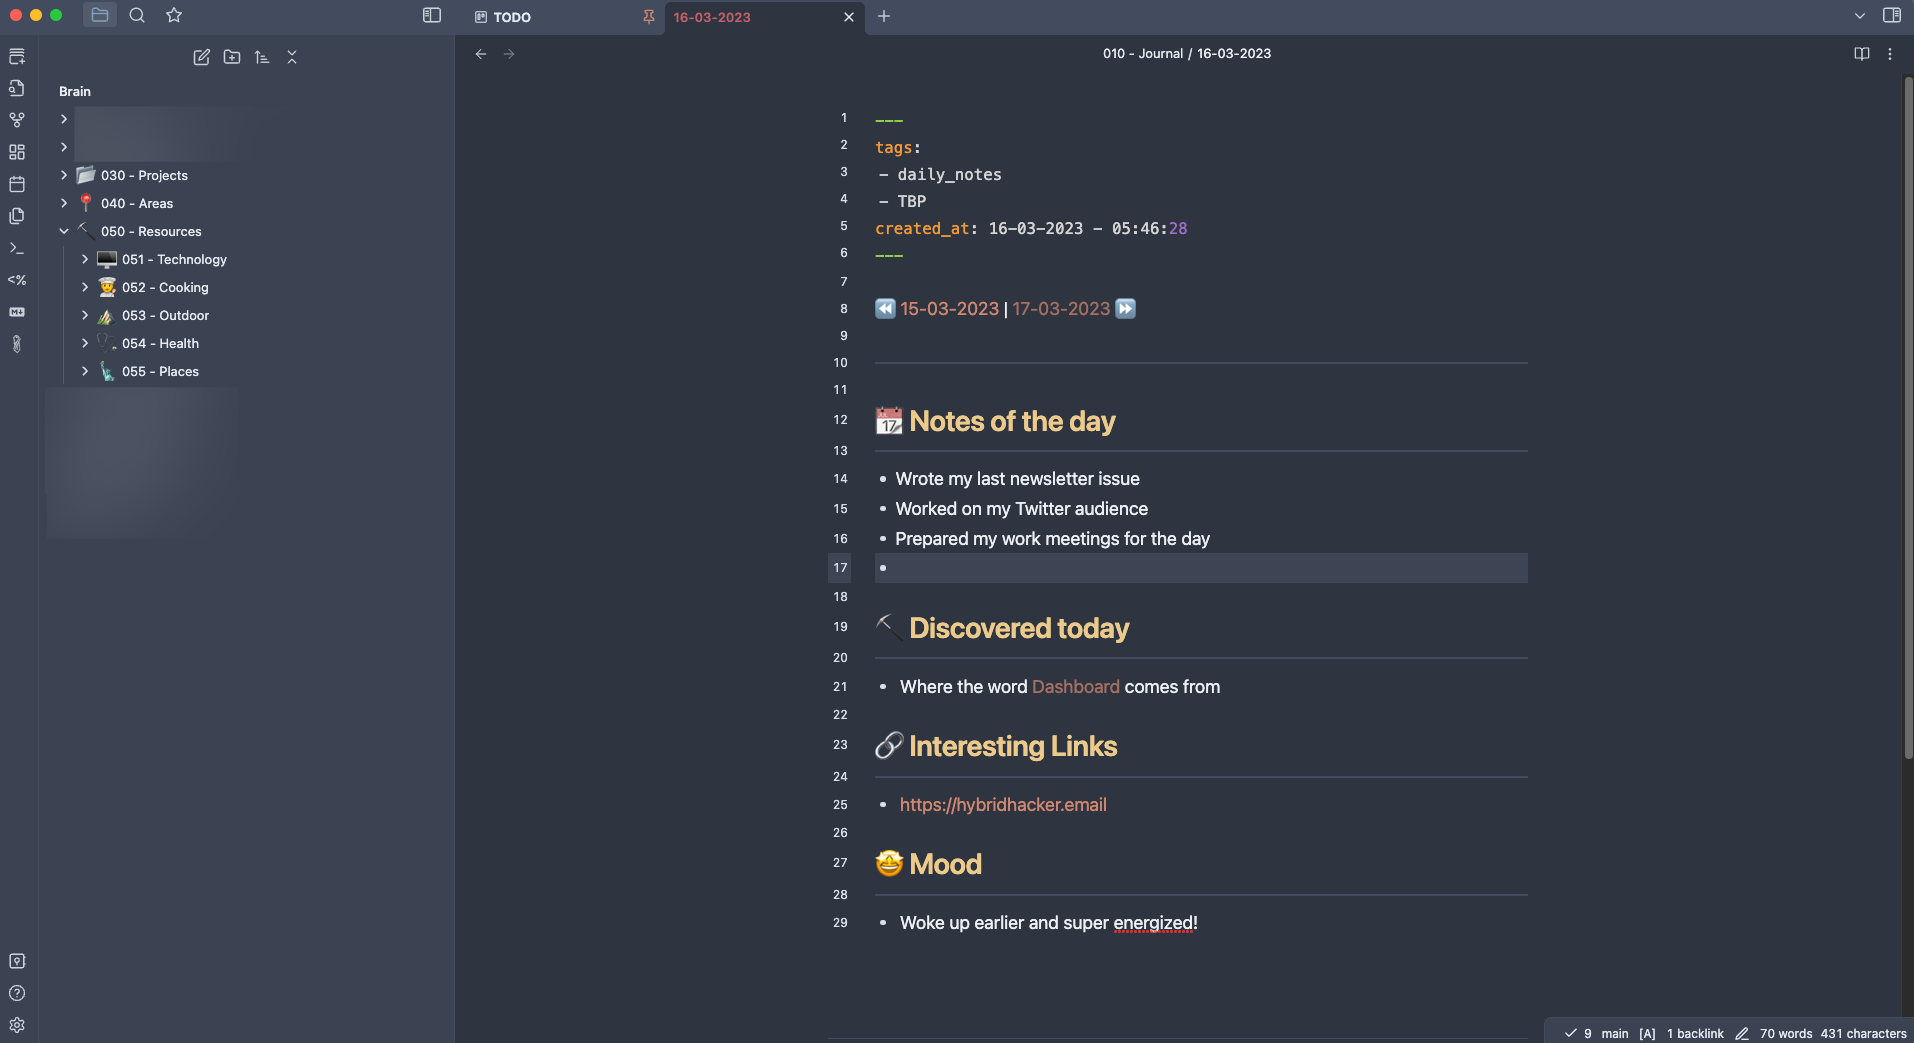
📅 Journaling
This is where everything starts. Every morning, the first note that automatically opens in my Obsidian vault is the daily note in the Journal folder. For this daily note, I created a template to record recurring things like:
🏃 Morning routine
📝 Notes of the day
⛏️ Discovered today
🔗 Interesting links
🤩 Mood
This note is my companion throughout the day. At the end of the day or week, I process it.
🗂️ PARA
Together with the Journaling folder, I have the PARA structure with Projects, Areas, Resources, and Archive folders. This is where I store and keep the notes and notions that are more actionable.
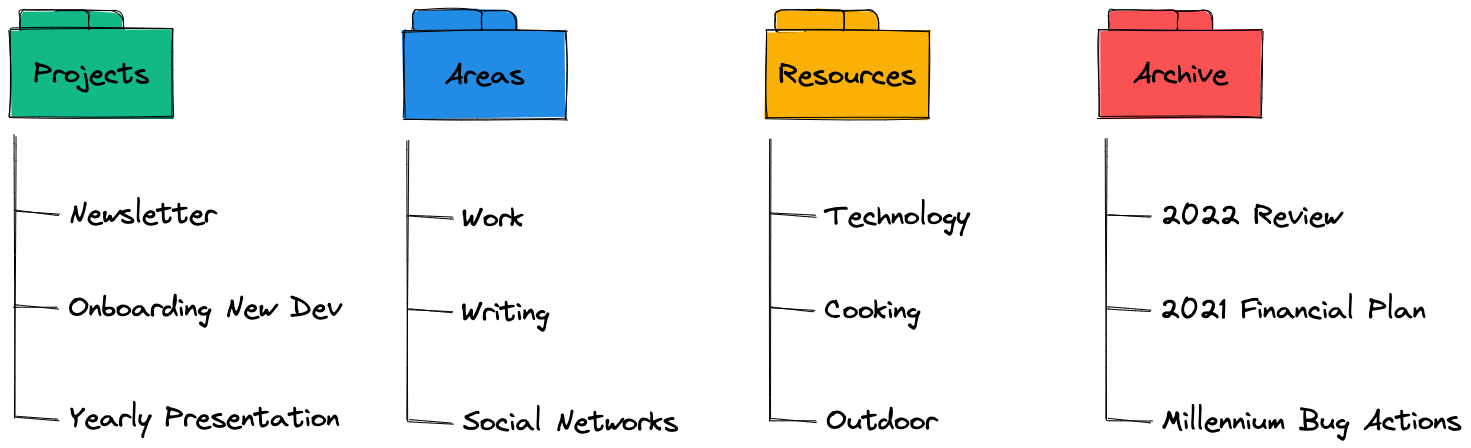
In the Projects folder, I keep things related to specific projects, such as my newsletter, work projects, and side projects. Just one folder for each project, no nested folders.
In the Areas folder, I collect things that are still actionable but have no fixed deadlines. Subfolders for work and essays are examples.
In the Resources folder, I keep mainly notions about my interests, such as Technology, Cooking, and Outdoor folders.
Lastly, I have the Archive folder where I put completed elements from the above folders.
🧠 Neurons
The Neurons folder is where I implement the Zettelkasten method. This method involves creating small, individual notes or "neurons" that can be linked together to form a network of knowledge. Within the Neuron folder, I have several subfolders to categorize my notes.
Fleeting Notes: These are quick, informal notes that capture a passing thought, idea, or observation. They are not necessarily meant to be kept long-term, but can be useful for sparking creativity or brainstorming.
Literature Notes: When reading a book, article, or a tweet, I take notes on important concepts, ideas, or quotes that I want to remember. These notes can be used to summarize the material, draw connections to other concepts, or provide support for future writing or research.
Evergreen Notes: These are more comprehensive notes that capture deeper insights, analyses, or ideas. They are meant to be more permanent and can be used as building blocks for future writing, essays, or thinking.
Using the Zettelkasten method and these subfolders within the Neurons folder, I can easily link related notes together and create a network of knowledge that can be easily navigated and expanded upon.
👥 Humans
The "Humans" folder is where I keep track of people and companies that I find interesting or relevant to my work and personal interests. Within this folder, I use templates to record information about:
Contacts: This includes people I know personally or have worked with, as well as people I've met at events or through online communities.
Influencers: I follow a number of thought leaders, bloggers, and other influencers in various fields. In this section, I keep notes on their work and ideas, as well as links to their websites, blogs, and social media profiles.
Companies: I'm always on the lookout for interesting startups and businesses that are doing innovative things. Here, I keep notes on companies I'm researching or following, including their mission, products or services, and any news or updates I come across.
Using this system, I can quickly access information about the people and companies that are important to me, and stay up-to-date on their latest activities and ideas.
⚙️ System
This section typically includes templates, attachments, drawings, and other system-level elements that support your note-taking workflow.
Templates can be particularly useful in this section. You can use templates to standardize the structure and content of your notes, making it easier to find and retrieve information later. Templates can be as simple as a blank document with a consistent header or footer, or they can be more complex, with multiple sections and pre-filled information. For example, you could create a template for meeting notes that includes a section for attendees, agenda items, and action items.
👨💻 Johnny.Decimal
While I agree with the "less folders, the better" approach, I find both PARA and Zettelkasten too strict. For this reason, I use Johnny.Decimal.
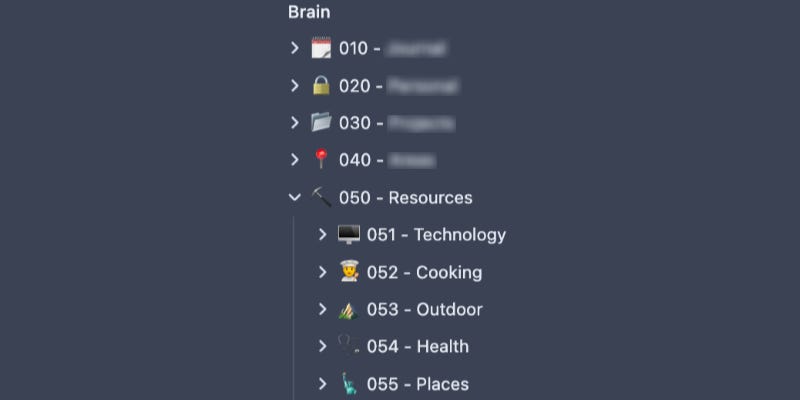
Johnny.Decimal is a system for organizing digital files and information. It uses a decimal numbering system to create a hierarchy of categories and subcategories. Each level of the hierarchy is separated by a decimal point. For example, a category might be assigned the number 100, and subcategories within that category might be assigned numbers such as 110, 120, and so on.
As you may see from the screenshot above, I use it in a bit different way, but the concept is pretty similar.
This system makes it easy to find and organize information quickly and efficiently.
👉 Conclusion
Today we covered:
Note-taking workflows
Note-taking systems
Obsidian (the software I use to take notes)
A quick look at how I process my daily notes
A quick look at how I organize all my notes (folders and Johnny Decimal system)
What's next? Here's my suggestion:
👀 Carefully read both issues (part 1 and this one) of How I take notes and be comfortable with the basic concepts
💾 Download Obsidian and become familiar with it
🧭 Explore all the options Obsidian provides and become familiar with concepts like Core Plugins and Community Plugins
💭 Think about the information that is relevant in your life and based on their actionability, decide where it could fit in
🏗️ Start building your personal knowledge system!
Be aware, I know it can initially seem daunting and like something that requires a lot of effort. But the more you get into note-taking, the more you will discover how it can make you more productive, organized, and effective in what you do.
Don’t be afraid to try it out and don’t aim to get everything done immediately. Building a note-taking system is something that can take months if not years, and it's a continuous process of evolution, so it's a never-ending effort.
🚀 The important thing is to start!